

Preview - Hyakunin Ikki
The Hyakunin Ikki is a domain-type event, where you can fight enemies and attain the highest score for greater rewards. The goal is for you to kill as many sets of enemies as possible, cycling through as many teams and characters within teams as possible to help increase your "Fervor" level.
For end-game players, this is a great avenue for you to test out your damage, especially with the various buffs given. However, Lower-AR players and beginners do not need to fret as there will be several trial characters given for each domain. These are fully built characters that can help carry you through the event. Do note that if you already have the character, you will be using your build for them.
The trial characters include Ayaka, Yoimiya, Itto, Razor, Xiangling, Kazuha.
Rules
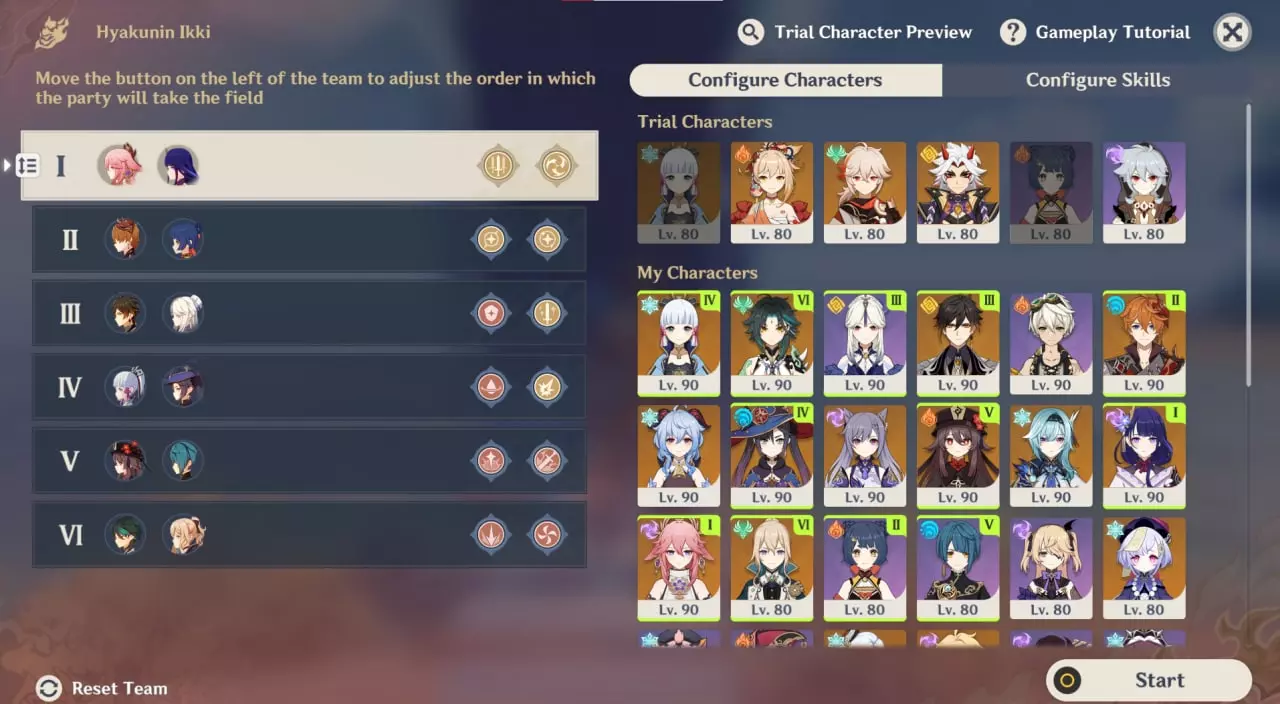
You will need to set up 6 teams (each team is comprised of 2 people) to bring into each domain. You will be able to swap from one team to another, but do take note of the sequence of the teams as you can only swap to the team listed directly after your current team. When choosing your teams, you should try to select Garyuu Arts that complement their playstyle and damage. You can read more about that in the next segment. Additionally, you will be able to select your multiplier which determines the difficulty of the challenge. I went with an x4 multiplier and all my characters, you can see the set-up that I went for above.
Transmission and Normal Secret Arts
Here is the list of Transmission and Normal Secret Arts available for selection, including character recommendations for each selection. I will try to include more F2P friendly characters as much as possible!
- Lion's Maw: After the party takes the field, they will create a Vacuum Field lasting 15s that pulls opponents in and deals Anemo DMG to opponents within its AoE once every 1s. This Vacuum field will disappear once you switch parties.
- Good for any pairs, especially if you don't have crowd control characters (like Kazuha, Venti, Sucrose).
- I would recommend this for characters that deal crowd damage such as Tartaglia, Hu Tao
- Radical Dispersal: Characters being protected by a shield will unleash a shockwave
- All shield characters like Zhongli, Diona, Thoma, Xinyan, Noelle etc.
- You can pair shield characters with Glass cannons like Ganyu or characters that do better when their attack combis are not disrupted like Yoimiya
- Twin Sin-Sundering Eyes: For 15s after the party takes the field, characters who use normal attacks will gain the effect. After 3 stacks, a Beam will be fired outward that deals True DMG to all opponents in it's path.
- Good for characters that use normal attacks, such as Eula, Yoimiya, Machine gun Fischl
- Accidental Intent: For 15s after the party takes the field, all party member's ATK speed +50%, resistance to interruption is greatly increased and active character's NA restores 8% HP to themselves on hit. HP regeneration effect can be triggered once every 4s.
- Once again, good for characters that use normal attacks like Eula, Yoimiya, Machine gun Fischl
- Tenko's Admonishment: For 15s after the party takes the field when a character's Elemental Skill hits opponents, all party members' Elemental Skill DMG will increase by 12.5% for 8s, triggering every 0.5s with max 4 stacks. After all stacks are gained, Elemental Burst DMG is increased by 50%.
- Good for characters with high Burst DMG and high use of Elemental Skill (e.g. Tartgalia, Hu Tao)
- Pruning: For 15s after the party takes the field, lightning will strike a maximum of 5 opponents each time a character restores HP, dealing Electro DMG. All active characters lose 0.5% HP per second, lightning can be released every 3s.
- Good for characters that restore HP by attacks (Jean, Qiqi)
- Whitewater Wave: After the party takes the field, they will create a Rippling Field lasting 15s that follows the character around and deals Hydro DMG to opponents within this AoE once every 1s. This Rippling field will disappear once you switch parties.
- I would recommend this for Permafreeze team compositions, with two Cryo damage dealers, such as Ayaka and Shenhe
- Alternatively, characters that deal Pyro damage (Diluc, Hu Tao, Yanfei, Xiangling) can consistently proc Vaporise reactions with the Ripping Field
- Moonshadow Fall: Greatly increases character jumping ability and increases all party members' Plunging Attack DMG by 85% for 15s after their party takes the field.
- Good for characters that do high numbers in plunging attacks
- I use this on Xiao or Physical DMG Keqing
- Four Oni of Ogata (Copied): For 15s after the party takes the field, an Elemental Blast will occur after a character defeats an opponent with a Charged Attack, dealing Elemental DMG to nearby opponents. The elemental blast will randomly deal Electro, Pyro, Cryo or Hydro DMG. One such blast can occur this way every 2s.
- This is good for characters that deal charged attacks, especially Electro/Pyro/Cryo/Hydro characters to proc elemental reactions
- I use this with my Hu Tao and Xingqiu team, but you can use it with Yanfei, Ayaka etc. since they use charged attacks
- Lightcleaver Blade: All party members have their Charged Attack Stamina Consumption decreased by 30%, have their Charged Attack DMG increased by 65%, have their resistance to interruption greatly increased, and have the ATK SPD of party members who use Claymores increased by 30% for 15s after their party takes the field.
- Good for Claymore characters that deal Physical DMG, such as Eula and Razor
- Celebrations Beyond Count: All party members gain a 30% CD decrease and their Elemental Burst DMG is increased by 50% for 25s after their party takes the field.
- This is great for characters like Tartaglia with long cooldowns
- We’re on Fire!: Greatly increases Fervor accumulation, for 25s after the party takes the field. Fervour is a mechanic that gradually increases as you defeat more enemies and swap between teams.
- Generally good for all team setups, place this in your earlier teams to allow greater Fervor accumulation since the start of the domain
- Phantom Eye: For 25s after the party takes the field, +150 bonus elemental mastery.
- Good for a party with lots of elemental reactions like Vaporise, Melt etc.
- I used this for my Tartaglia and Xiangling team composition.
- Fiery Banishment: For 25s after the party takes the field, +60% Pyro damage bonus.
- Klee, Hu Tao, Diluc, Yanfei, Yoimiya, Xiangling, Amber
- Frigid Regimen: For 25s after the party takes the field, +60% Cryo damage bonus.
- Ganyu, Ayaka, Aloy, Chongyun, Kaeya
- Light Across the Fields: For 25s after the party takes the field, +60% Electro damage bonus.
- Raiden Shogun, Fischl, Sara, Keqing Electro Build, Yae Miko, Lisa, Beidou
- Shrine of Stone: For 25s after the party takes the field, +60% Geo damage bonus.
- Zhongli, Ningguang, Arataki Itto, Albedo
- Cacophonic Showers: For 25s after the party takes the field, +60% Hydro damage bonus.
- Tartaglia, Mona, Kokomi
- Scything Winds: For 25s after the party takes the field, +60% Anemo damage bonus.
- Kazuha, Xiao, Venti, Jean, Sucrose
- Way of Tatara: For 25s after the party takes the field, +100% Physical damage bonus.
- Eula, Razor, Keqing Physical Build, Rosaria, Xinyan
- Clean Cut, True Sight: For 25s after the party takes the field, +60% crit damage.
- Good for all Main DPS characters that you have built to deal large amounts of CRIT DMG
- I think this is better for characters with good scaling like Hu Tao, Eula, Ganyu
- Unique Life: For 25s after the party takes the field, +60% ATK.
- Good for all Main DPS characters, perhaps good for Qiqi/Jean if you require a lot of heals as they heal off ATK
Teams
- You can see the team I used above, but a recommended F2P-friendly team would be: Yanfei and Xingqiu, Ningguang and Diona, Barbara and Kaeya, Xiangling and Chongyun, Fischl and Sucrose, Lisa and Rosaria.
- For the first domain "Burn, my Microcosmos!", you gain 8 points for killing all regular Hilichurls and Samachurls, but 15 points for killing the Mitachurls and 40 points for killing the Thunderarm Lawachurl. Hence, ensure that you bring characters that can break the Electro shield of the Lawachurl quickly, like Cryo and Pyro characters.
- For the second domain "Crisis! One Person Versus the World!", the first enemies are Nobushi, then Electro Cicin mages, Kairagi and Fatui Agents. To prevent the Kairagi from healing quickly, ensure you bring characters that deal large DMG numbers (with buffs that increase CRIT DMG)
- For the third domain "Thunderbolts and Lightning, So Knock on Wood!", the first enemies are Hydro Abyss Mages with Hilichurls, then Hydro Mimics and lastly, Bathysmal Vishaps. I would recommend bringing Cryo characters in your earlier teams to break the Hydro Abyss Mage shields quickly, then using characters that deal large DMG numbers (with buffs that increase CRIT DMG) for the Bathysmal Vishaps as they are rather tanky.
Rewards
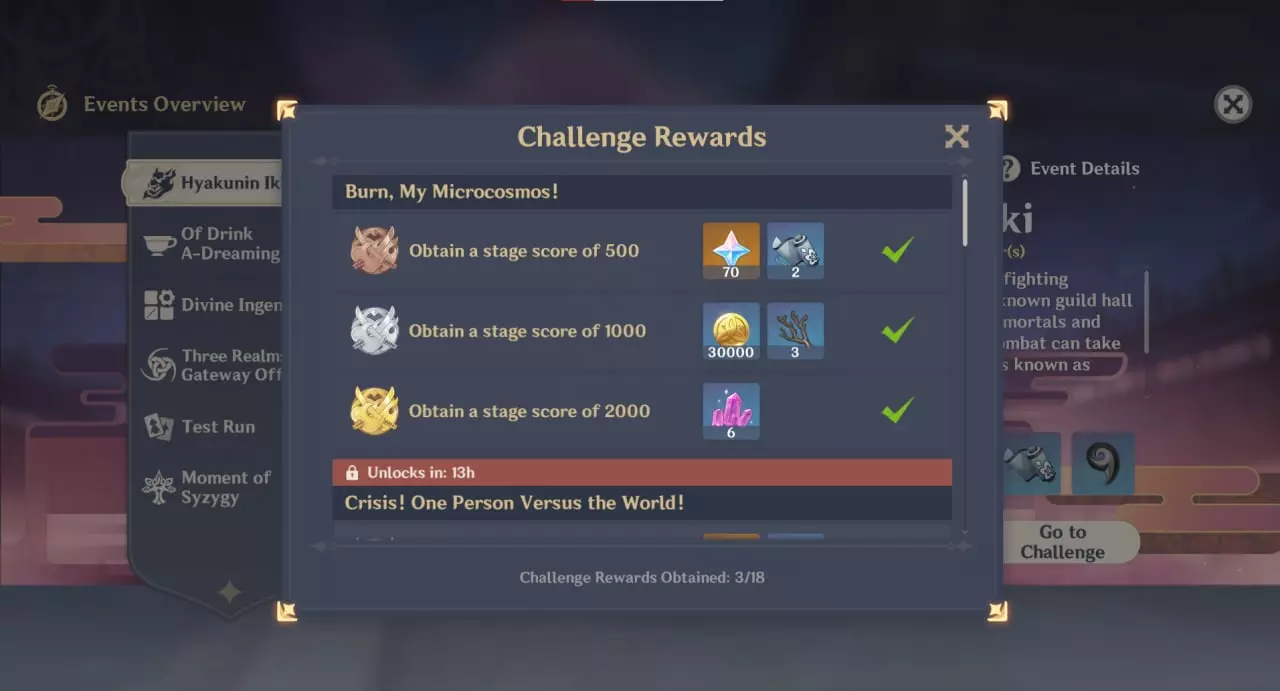
There are 6 domains of varied difficulties. If you complete all domains and obtain the highest score, you can obtain the following rewards:
Primogems x420
Talent Books x4 of each (Inazuma talent books)
Inazuma Weapon Materials (Blue) x6 of each
Mora x180,000
Mystic Enhancement Ores x36
We hope that you have found this article helpful and that you will enjoy the new updates in the 2.5 version of Genshin Impact (more information here)! For more information on Yae, you can check out my Yae build article here, or my Yae constellations, weapon and kit review here. You can read a guide on how to defeat Raiden Shogun Weekly boss here. Do lookout for more Genshin guides from me and let us know if there are other articles you would like to read!
or post as a guest
Be the first to comment.